
Introduction
When we set out to revamp the tracking system for Cityflo, we quickly realized we needed a way to align the vehicle locations we receive with actual roads. While Google Maps offers a Snap to Roads API that accomplishes this, it can get quite expensive when you’re processing locations in real-time.
Enter osrm-backend, a powerful routing engine coded in C++ that uses OpenStreetMap data. What piqued our interest was its match service, which is excellent for correcting noisy GPS data by snapping it to the closest road network.
Technologies
For deploying osrm-backend, we’ll be leveraging the following technologies:
- Docker: For containerizing our application
- Node (ExpressJS): To build our OSRM API backend
- Osmium: A helpful tool for handling OpenStreetMap data
Preparing Data
At the time of penning this article, Cityflo is serving just two Indian cities—Mumbai and Hyderabad. OpenStreetMap has segmented India into various zones, each covering a specific geographical area. To construct our network graph for Mumbai and Hyderabad, we’ll need to focus on obtaining data for both the Western and Southern zones of India.
The code snippets provided in this article presume that you’ve already installed osrm-backend, docker, osmium, and wget on your development environment.
wget -nc -O /tmp/india-western.osm.pbf https://download.geofabrik.de/asia/india/western-zone-latest.osm.pbf
wget -nc -O /tmp/india-southern.osm.pbf https://download.geofabrik.de/asia/india/southern-zone-latest.osm.pbf

osmium merge /tmp/india-western.osm.pbf tmp/india-southern.osm.pbf -o data/india-western-southern.osm.pbf
Next, let’s get the merged data file ready for OSRM with the commands below. We’ll stick to using the car mode to construct our network.
osrm-extract -p /opt/car.lua data/india-western-southern.osm.pbf

# The order of the following commands needs to be this way if you want OSRM
# to use MLD(Multi level Dijkstra) algorithm for graph traversal
osrm-partition data/india-western-southern.osrm
osrm-customize data/india-western-southern.osrm
Note that the commands mentioned are resource-intensive, both in terms of CPU and memory. The system requirements will depend on the volume of the data you’re dealing with. For the context of this tutorial, you should have a minimum of 8GB of RAM on your development machine.
Development Server
The osrm-backend ships with a built in http server which is not fit for production deployment. You can use it to test in the development mode.
The development server can be started with
# Start development server
osrm-routed -algorithm mld data/india-western-southern.osm.pbf
The osrm-backend repository provides bindings for nodejs which can be used to build a node based server in any framework. We’ll be using ExpressJS as our nodejs framework.
With the map data now prepped, we can proceed to setting up the osrm-backend server.
Docker Image
Let’s create two files package.json and index.js with the following contents respectively:
// package.json
{
  "name": "osrm-backend",
  "version": "1.0.0",
  "description": "osrm-backend docker image builder with western and southern India map data",
  "main": "index.js",
  "dependencies": {
    "express": "^4.18.2",
    "@project-osrm/osrm": "^5.27.1"
  }
}
// index.js
const express = require('express')
const OSRM = require("@project-osrm/osrm");
port = process.env.PORT || 5000;
var app = express();
var osrm = new OSRM({algorithm: 'MLD', path: "./data/india-western-southern.osrm"});

function match(req, res) {
    radiuses = req.query.radiuses ? req.query.radiuses.split(';').map(Number) : null;
    timestamps = req.query.timestamps ? req.query.timestamps.split(';').map(Number) : null;
    coordinates = req.params.coordinates.split(';');
    for (var i = 0; i < coordinates.length; i++) {
        coordinates[i] = coordinates[i].split(',').map(Number);
    }
    var options = {
        coordinates: coordinates,
        timestamps: timestamps,
        radiuses: radiuses,
    };
    osrm.match(options, function(err, result) {
        if (err)  {
            console.log(err);
            return res.json({
                error: err.message
            });
        } else {
            return res.json(result);
        }
    });
}

app.get('/match/v1/driving/:coordinates', match);
app.listen(port);
This is our express server which internally calls the node bindings for osrm-backend. Now we need to create the Dockerfile for this application.
# Dockerfile
FROM node:18-bullseye

RUN apt-get update && \
    apt-get install -y build-essential git pkg-config cmake gcc libbz2-dev \
    libxml2-dev libzip-dev libboost-all-dev lua5.2 liblua5.2-dev libtbb-dev

WORKDIR /service

ADD data ./

COPY ["package.json", "index.js", "./"]

EXPOSE 5000

RUN npm install

CMD [ "node", "index.js" ]
And that’s a wrap! You can build the Docker image using the command docker build -t osrm-backend . and then deploy it using your cloud provider of choice. While this method results in a larger image size, it is more resource-efficient at runtime compared to running osrm-routed.
We’ve successfully deployed this on AWS ECS, allocating just 0.25 CPU and 0.5GB of RAM. Below are the runtime metrics to give you an idea of the resource usage.
| CPU Usage | Memory Usage |
|---|---|
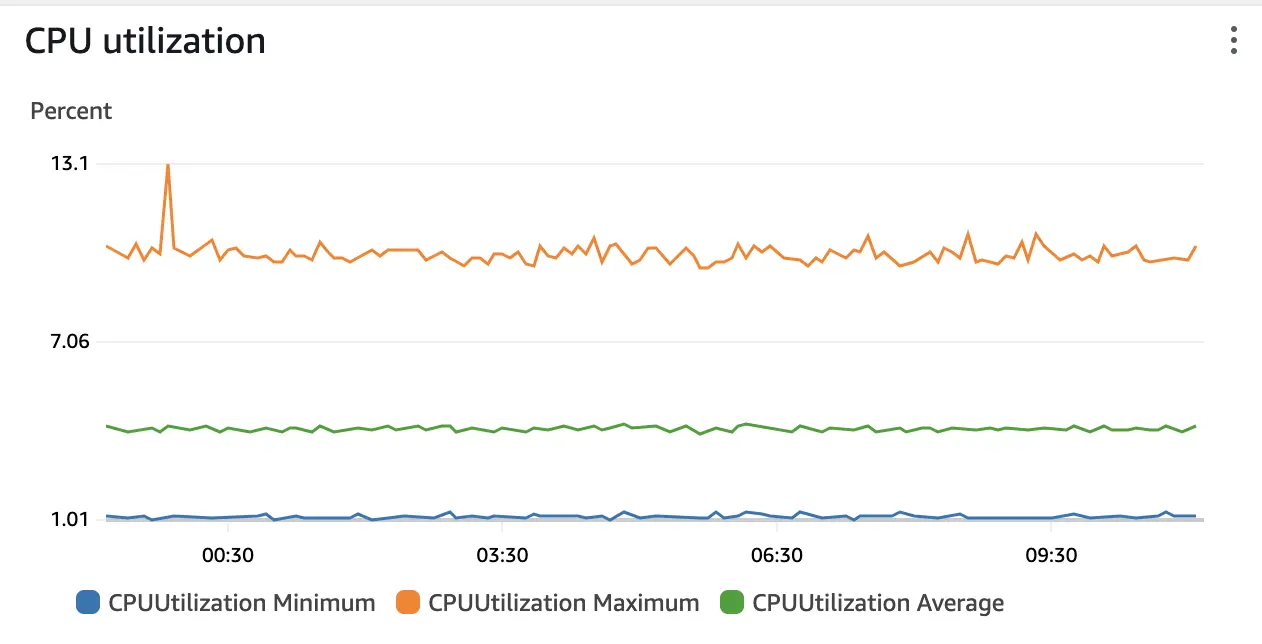
|
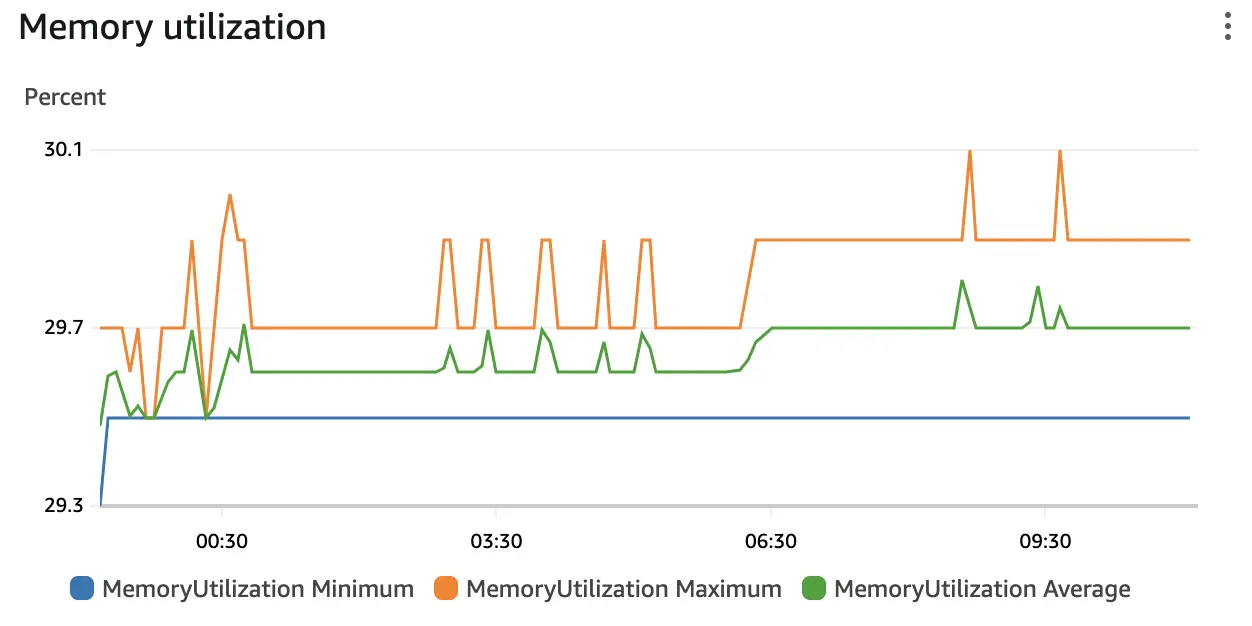
|
Conclusion
We’ve walked through the entire process of deploying osrm-backend to production, from data preparation to server setup and cloud deployment. While our approach may lead to a larger initial image size, it offers notable benefits in terms of runtime resource efficiency. Our experience with AWS ECS has been smooth, and the runtime metrics are quite promising.
Deploying such a solution not only saves costs but also provides an efficient and reliable service for snapping GPS locations to road networks. Whether you’re working in a small startup or a large enterprise, optimizing resource usage while delivering high-quality services is key to long-term success.
Thanks for reading! If you have any questions or thoughts, feel free to drop them in the comments section below. Happy coding!